Zadika4U

Design By Diens Zge

Zadika4U

Design By Diens Zge

Zadika4U

Design By Diens Zge

Zadika4U

Design By Diens Zge

Zadika4U

Design By Diens Zge

Selasa, 23 Oktober 2012

Download games Virtual City 2: Paradise Resort Final Version


Virtual City 2: Paradise Resort Final Version

Expand your building empire from the sunny coasts of Florida to the snowy lands of Alaska in Virtual City 2: Paradise Resort! Take on unique missions and complete special goals to earn more money and upgrade your cities. Construct a casino, spruce up a ski resort, indulge in an Ice Hotel, and much more in this incredible Strategy game!

*Incredible gameplay
*Fantastic fun
*Expand your building empire!

This new version of the game fixes levels 2-13 and 3-13 (Beach Resort and Ice Hotel) where the buttons “launch” and “build” were not displayed.


DOWNLOAD LINK  :
 

Or

Senin, 22 Oktober 2012

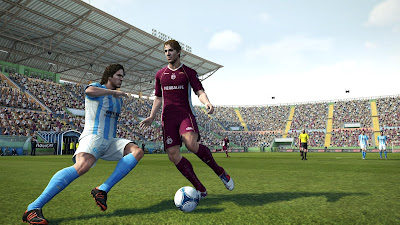
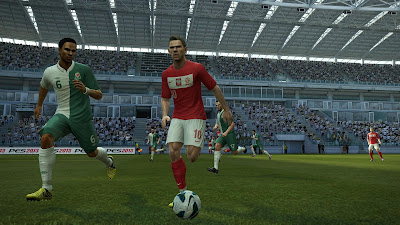
PESEdit.com PES2013 Patch 2.1 + 2.1.1 FIX ( update 22-10-2012)

PESEdit.com 2013 Patch FIX 2.1.1


NEW FEATURES:
  • New league: Argentina League (16 full teams with correct squads, lineups, kits & stadiums)
  • Fixed boots, accessories, positions for more than 2000 players
  • Fixed online switch
  • Added correct kits for all national & classic teams
  • New faces: 20 new faces, including Gago, Nastasic, Verratti
  • New kits: Ireland, Real Sociedad, Wales
  • Added Serie A scoreboard
  • Correct transfers like Alex to Coritiba or Hitzelsperger to Everton, created more than 20 missing players
  • Added switch to use game version 1.00 or 1.01
  • UPDATED to full 20 teams league after Apertura 2012 finishes in December
General Features:
  • Added Bundesliga, Liga Argentina, 2. Bundesliga, Liga Adelante, Npower Championship
  • Added other teams (Viktoria Plzen, BATE Borisov, Metalist Kharkiv, Rubin Kazan, Anzhi, and more)
  • Correct kits for all National & Classic teams, Premier League & Liga ZON Sagres teams
  • Corrected names for fake players in unlicensed National teams and ML unlockable players
  • Faces: More than 430 new faces
  • Fixed kits for a lot teams including Barcelona, Manchester United and Sevilla
  • Includes DLC 2.0
  • Removed blur
HOW TO USE:
  1. Delete the kitserver13 folder (skip this if this is your first PESEdit 2013 patch )
  2. Install the Patch AIO using installer.exe, make sure to choose the directory you installed PES 2013 to.
  3. Install the Patch FIX (IF ANY) using installer.exe, make sure to choose the directory you installed PES 2013 to.
  4. Start the game via pes2013.exe / start menu folder PESEdit.com 2013 Patch\Selector

DOWNLOAD LINKS Patch 2.1:

PESEdit.com 2013 Patch 2.1 AIO - 4 Part Links :
  1. http://adf.ly/Dwk9q
  2. http://adf.ly/DwkGD
  3. http://adf.ly/DwkIA
  4. http://adf.ly/DwkLG

PESEdit.com 2013 Patch 2.1 AIO - 2 Part Links :
  1. http://adf.ly/DwkN4
  2. http://adf.ly/DwkP2
PESEdit.com 2013 Patch 2.1 AIO - Single Links :
  1. http://adf.ly/EAead
DOWNLOAD LINKS
 Patch FIX 2.1.1

fixes kits for the following national teams:
Argentina, Belgium, Colombia, Lebanon, Mexico, Peru, Oman, Tunisia

 
INDOWEBSTER    :  CLICK HERE
 
RAPIDSHARE    :  CLICK HERE

FILEFACTORY  :  CLICK HERE

DEPOSITFILES :  CLICK HERE

UPLOADED       :  CLICK HERE

Senin, 15 Oktober 2012

Tutorial Tehnik DOF ( Depth of Field ) Pada vray Sketchup


Memahami Depth of Field

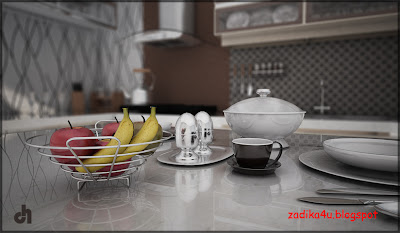
Depth of field – DOF, adalah ukuran seberapa jauh bidang fokus dalam foto. Depth of Field (DOF) yang lebar berarti sebagian besar obyek foto (dari obyek terdekat dari kamera sampai obyek terjauh) akan terlihat tajam dan fokus. Sementara DOF yang sempit (shallow) berarti hanya bagian obyek pada titik tertentu saja yang tajam sementara sisanya akan blur/ tidak fokus.
Untuk mendapatkan DOF yang lebar gunakan setting aperture yang kecil, misalkan f-22 (makin kecil aperture makin luas jarak fokus), Sementara untuk mendapat DOF yang sempit, gunakan aperture sebesar mungkin, misal f/2.8
Pada desain 3d sendiri banyak yang menggunakan DOF sebagai salah satu tehnik merender untuk mengimplementasikan hasil desainnya,
Untuk itu saya akan memberikan sedikit pengetahuan tentang DOF pada vray sketchup untuk para sobat semua..
 
DOF di SU+vray4su bisa dilakukakan dengan 2 cara :

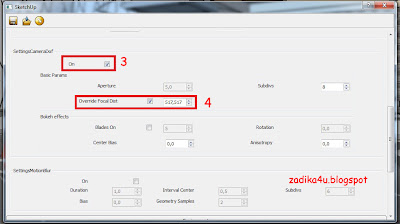
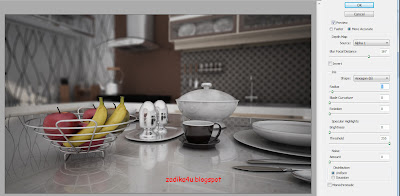
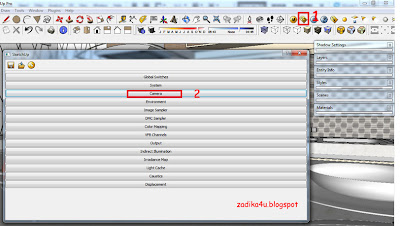
1. Dengan setting langsung di vray4su pada tag Option > Camera > Centang Setting Camera Dof menjadi 
    on >  centang dan isikan nilai Override Focal Dist sejarak antara kamera dengan objek yg menjadi  
    Point of View (PoV) kita dengan satuan inchi. dan Langsung dirender.


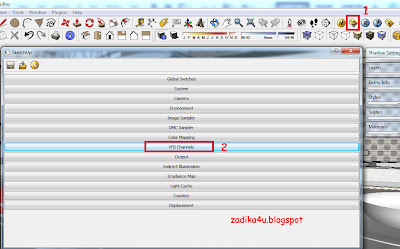
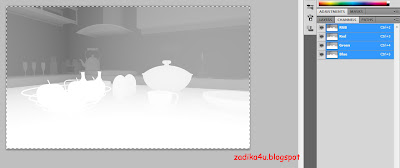
 2. Render pada Vray Sketchup Dengan bantuan Photoshop. Caranya dengan membuat hasil render Zdepth 
     channel selain RGB Color channel (default-nya bersama alpha channel) pada tag vray
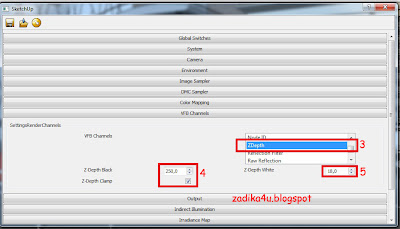
     Option > VFB Channel > pilih Zdepth channel > masukkan nilai antara jarak terdekat Pov dan 
     terjauhnya di sini saya menggunakan satuan centimeter. semisal Pov pada jarak 150, maka masukkan 
     Zdepth black 250 ( jarak terjauh ) dan Zdepth white 18 ( Jarak terdekat ). Lalu  Render!!. 
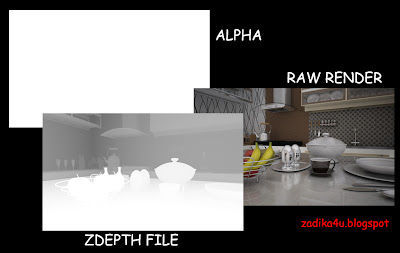
     dan hasil rendernya  kemudian diolah pada Photoshop.


    setelah di Render dan save, Sobat memiliki 3 berkas


Pengolahan Pada Photoshop, 
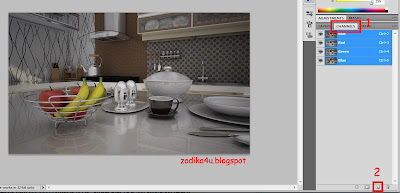
  • Buka image hasilnya Raw Render dan dan Zdepth file ( pada photoshop )
  • Buka File Zdepth lalu Copy Zdepth file tadi ( ctrl + A lalu ctrl + C )
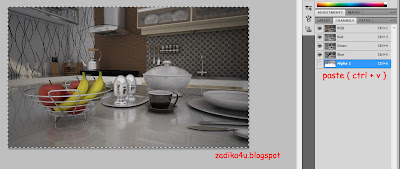
  • Buka File Raw Render lalu buka Tab Channel ( sebelah kanan ), Create new Channel
 
  • Paste - kan Zdepth file tadi
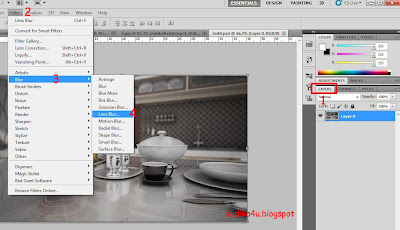
  •  Kembali ke LAYER lalu buka tab Filter - Blur - Lens Blur 
 
  • Setelah itu atur Radius blurnya sesuai keinginan. apabila sudah puas dengan hasil bluringnya lalu klik OK. dan Proses efek DOF dengan Photoshop selesai.
  • Perbedaan cara ke 2 ini adalah dari segi waktu. yang akan menyita banyak waktu
Terserah sobat cara mana yang lebih enjoy dan efektif


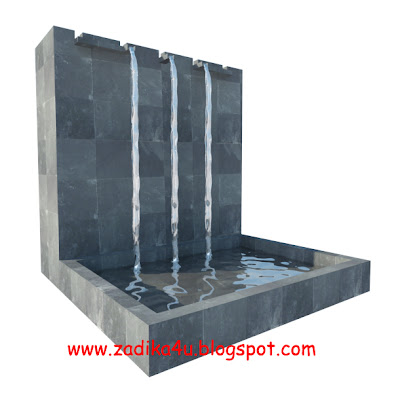
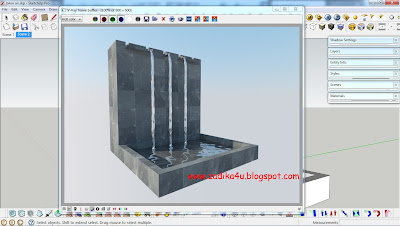
Cara membuat efek air mengalir dengan vray sketchup

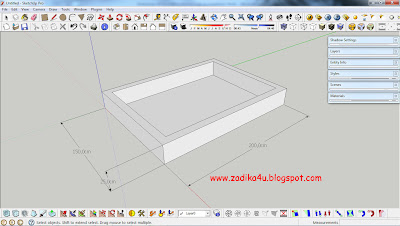
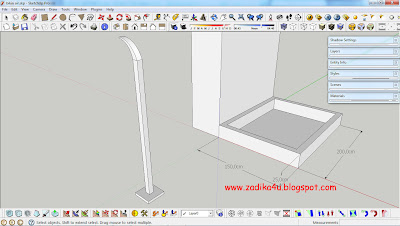
1. Buatlah Kolam dengan ukuran yang sobat kehendaki,, sebagai contoh saya buat uk P:200cm, L:150cm
    T:25cm


 2. Buatlah Dindingnya


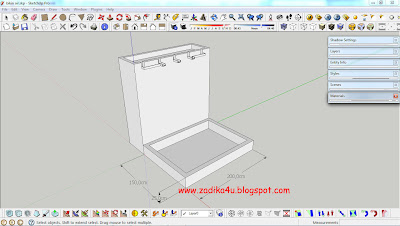
3.  Mulai Membuat model  aliran air menggunakan kolom ramping seperti gambar di bawah..


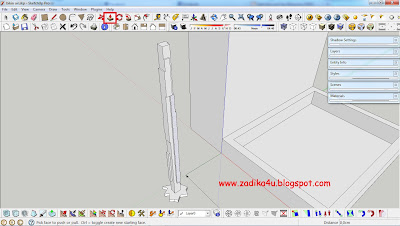
4. Buatlah tonjolan tonjolan aliran air tersebut dengan munggunakan Pushpull..


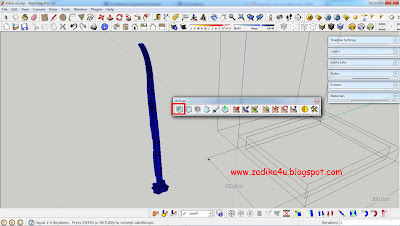
5. Setelah pemodelan aliran air, select medel tersebut lalu gunakan subdivide and smooth dari artisan..


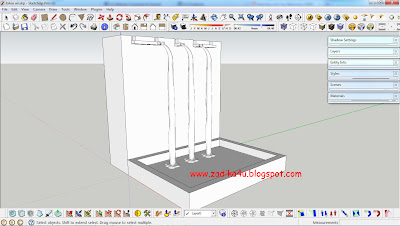
6. Simpan pada dinding yang telah di buat sesuai arus  air tersebut...


7. Lalu Render.. dan hasilnya akan seperti di bawah ini.. 


8. Enjoy...^_^


Jumat, 12 Oktober 2012

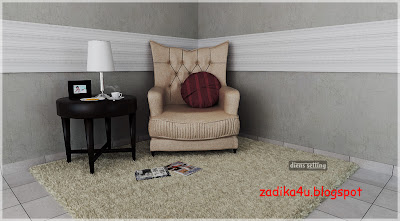
TUTORIAL BIKIN CARPET DI VRAY SKETCHUP


Dalam posting kali ini saya akan memberikan tutorial membuat carpet di sketchup dan menggunakan alat render  vray ver1.49..
ok.. kita langsung saja ke intinya..

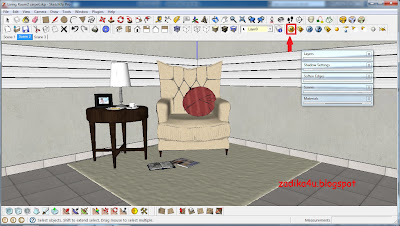
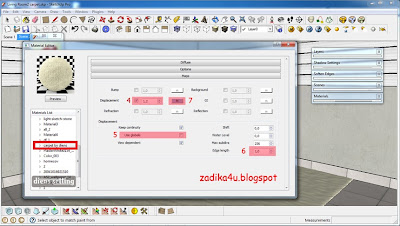
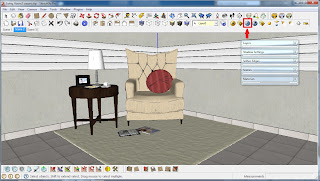
I. Buka File Sketchupnya,  lalu klik Material editor yang di beri tanda merah


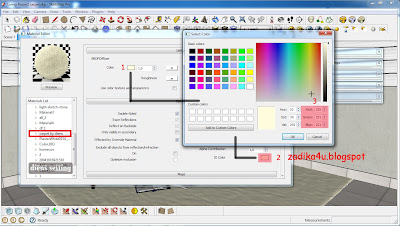
II.  Cari material carpetnya pada bagian Diffuse...
     1. color dan 
     2. Id color berikan warna yang sama sesuai selera sobat
     3. Atur cursor warnanya


 III. Pada Bagian Maps..
       4. Check Displacement berikan nilai 1,2 sesuai ketinggian yang diperlukan
       5. Uncheck use globals
       6. Beri nilai 1 pada edge length
       7. Klik M


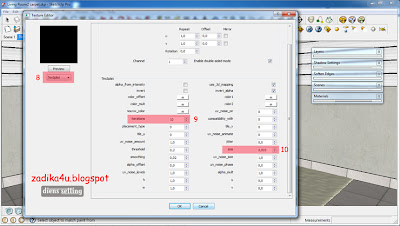
 IV. Setelah meng Klik M no 7 akan keluar tab baru..
        8. Klik pada texSplat
        9. Beri nilai 10 pada Iteration
      10. Dan terakhir beri nilai 0,005 pada size agar terlihat lembut
      11. Klik Ok


V. Setelah beres semua Lalu Render klik R pada toolbar.. dan tunggulah beberapa saat maka hasilnya akan 
    seperti gambar di atas..

 
VI. Selamat Mencoba